
Friday, May 23, 2008

Tuesday, April 8, 2008
When I Said Random, I Meant It, a.k.a. A Springy Burst of Work
I have been trying to build up a good stash of material to play with when the mood strikes. While I know I can whip up a mean Halloween costume, sewing other kinds of things is iffy at best for me and I hate to pay full price for fabric only to make very expensive rags. In order to accomplish this good stash, I've been frequenting the thrift store and buying up their stock of fabrics. The following have been my recent hauls. Some are totally hilarious but were too cheap to pass up. All of them were purchased for under two dollars, most of them had more than 5 yards.


In addition, I have been saving various items that would normally go into the trash or recycle bin and trying to breathe new life into them. This item used to be an oatmeal cannister. I removed the paper label to reveal plain uncorrugated brown cardboard. I then painted it with white acrylic paint and a sponge-on-a-stick (my new favorite tool) and let it dry overnight. I then used a textural stencil kit to place the leafy design on it. I'm still not sure what it is going to be useful for but it did make me happy.

The last item was inspired by some crafty people on Craftster. I found a great tutorial for fabric flowers and was up half the night trying to make it work for me. I had little luck until this afternoon when I decided to try again. Again, I have no idea at this time what to use this for, but it is pretty and made me smile and feel springy even though it is gray outside.


In addition, I have been saving various items that would normally go into the trash or recycle bin and trying to breathe new life into them. This item used to be an oatmeal cannister. I removed the paper label to reveal plain uncorrugated brown cardboard. I then painted it with white acrylic paint and a sponge-on-a-stick (my new favorite tool) and let it dry overnight. I then used a textural stencil kit to place the leafy design on it. I'm still not sure what it is going to be useful for but it did make me happy.

The last item was inspired by some crafty people on Craftster. I found a great tutorial for fabric flowers and was up half the night trying to make it work for me. I had little luck until this afternoon when I decided to try again. Again, I have no idea at this time what to use this for, but it is pretty and made me smile and feel springy even though it is gray outside.

Tuesday, April 1, 2008
Bachelorette Party

Two of my good friends from my softball team are getting married so we threw them a surprise bachelorette party this past Saturday night. If anyone out there has ever thrown one of these bashes, they know that the commercially made stuff for these parties is ridiculously expensive. Buck-a-suck shirts, made on cruddy looking, ill fitting men's t-shirts can run upwards of 30 bucks. Hokey looking headgear is equally expensive. The above ensembles were made for 7 dollars each, fit the girls beautifully, and were WAY nicer than any of the items on the market.
Cost breakdown:
Pink Longsleeve Shirts on clearance $3.00
Pink baseball caps at Dollar Tree $1.00
1/2 a roll of tulle from Dollar Tree $.50
1/2 a silk floral pick from Joann Fabrics $.50
1/2 a bag of Lifesavers from Dollar Tree $.50
1/2 a roll of white wired ribbon from Dollar Tree $.50
Curly gift ribbon from Dollar Tree $1.00
The veils were assembled using the wire of a floral pick to hold the tulle together, adding a large bow of the white wired ribbon to that, then the hotglue gun attached the curly ribbons to the wires from the picks, then hotglue to the top of the cap. The Lifesavers were attached to the shirts simply by wetting and applying them directly to the shirts. All of the writing was done by moi with a couple of Sharpie markers.
Monday, March 17, 2008
Current Project / Commission
During an evening of red wine drinking bliss, I came up with an idea for my friend Cid who works at the local Mexican restaurant as a waitress. I decided to make a custom waitress apron for her that fit in better with the restaurant's casual charm. It came out like this:

I knew it was cute. I knew the craftsmanship was spot on. What I didn't know is that the restaurant owner would order ten of them. Unfortunately, both a blessing and a curse as the fabric I had chosen was a Joann Fabrics clearance item and there was no more to be had anywhere in the country. I only had enough for four aprons. What to do?
Well, one bit of relief came when Mister Restaurant Owner requested two of the aprons be made for men, slightly longer and with a more manly, royal color scheme. Phew. A suitable selection was made and then I went on to figure out how to make 8 aprons from enough material for four.
What I decided to do was choose a coordinating solid color. Since I had already cut out the pieces for four aprons, I decided to create four aprons with the solid back and striped pocket and cord and then four with the solid pocket, striped back, solid cord. Here's one in progress:

Some things I've learned from this process:
1. Learn to say no.
2. Never accept a commission even after one glass of wine.
3. Never price items after said glass of wine. (I'm making almost zero profit on these)
4. Learn to say no.
Honestly, I'm so excited to be working on my first commission. I just hope that should I be fortunate enough to be given another, that I will have worked out all the kinks on this project.

I knew it was cute. I knew the craftsmanship was spot on. What I didn't know is that the restaurant owner would order ten of them. Unfortunately, both a blessing and a curse as the fabric I had chosen was a Joann Fabrics clearance item and there was no more to be had anywhere in the country. I only had enough for four aprons. What to do?
Well, one bit of relief came when Mister Restaurant Owner requested two of the aprons be made for men, slightly longer and with a more manly, royal color scheme. Phew. A suitable selection was made and then I went on to figure out how to make 8 aprons from enough material for four.
What I decided to do was choose a coordinating solid color. Since I had already cut out the pieces for four aprons, I decided to create four aprons with the solid back and striped pocket and cord and then four with the solid pocket, striped back, solid cord. Here's one in progress:

Some things I've learned from this process:
1. Learn to say no.
2. Never accept a commission even after one glass of wine.
3. Never price items after said glass of wine. (I'm making almost zero profit on these)
4. Learn to say no.
Honestly, I'm so excited to be working on my first commission. I just hope that should I be fortunate enough to be given another, that I will have worked out all the kinks on this project.
Saturday, March 8, 2008
Using Up Scraps....
I made this fabulous lapquilt for my mother in law for Christmas. I'll have to dig up some pics of it and give it an entry all of it's own one day soon. The road to finishing that project was filled with as many bumps and potholes as the Dan Ryan Expressway this long LONG winter. There were days working on that project where all I could do was curse a blue streak. It helped me learn an important crafting lesson.
"When you hit a brick wall, play with something else until the headache goes away."
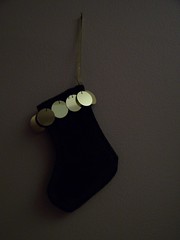
So, I took some scraps of the material I used for the lapquilt and made these cute little stockings for gifts. This one, excuse the poor photo, is made of a lovely chocolate brown velvet with handstitched sequins adorning the top hem. Only took about a half hour. And it made my headache go away, too.
"When you hit a brick wall, play with something else until the headache goes away."
So, I took some scraps of the material I used for the lapquilt and made these cute little stockings for gifts. This one, excuse the poor photo, is made of a lovely chocolate brown velvet with handstitched sequins adorning the top hem. Only took about a half hour. And it made my headache go away, too.
Thursday, March 6, 2008
Decou--WHAT?
Yes, dear readers, I have gone to the dark side. I decoupaged a piece yesterday and found the process not only fun but exceptionally rewarding. And Mister D had a great time tearing up the bits of paper to help out.
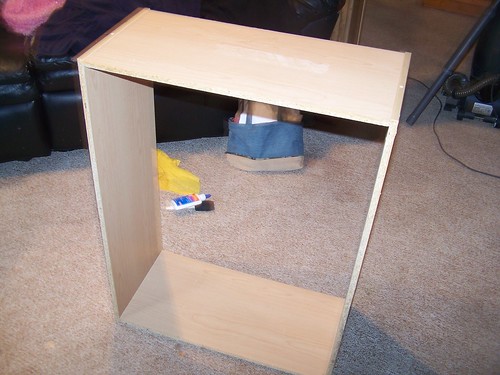
Before, a worn out looking MDF shoe cabinet, also known as "The Shoe Kitchen" in our house. It had some water damage to the top of it and well, it was ugly ol' MDF.
I prepped by lightly cleaning the surface of dust and stickiness. Gotta love the Stretch-N-Dust :-)
And now, the after:
I am really happy with the result and with how easy and inexpensive this was to do. The paper is the remnant of a roll of wrapping paper that I found behind my television while dusting. (Note to self, dust more, you may find more goodies.) I know there are various gluey substances that can be bought but this was done with good ol' white glue, a bit of water, and a sponge on a stick. The biggest problem I ran into was the bubbles that seemed to plague larger pieces. I had to spend extra time smoothing with my fingers.
If I start making cozies of any variety, please, someone, commit me to the nearest mental health facility.
Before, a worn out looking MDF shoe cabinet, also known as "The Shoe Kitchen" in our house. It had some water damage to the top of it and well, it was ugly ol' MDF.
I prepped by lightly cleaning the surface of dust and stickiness. Gotta love the Stretch-N-Dust :-)
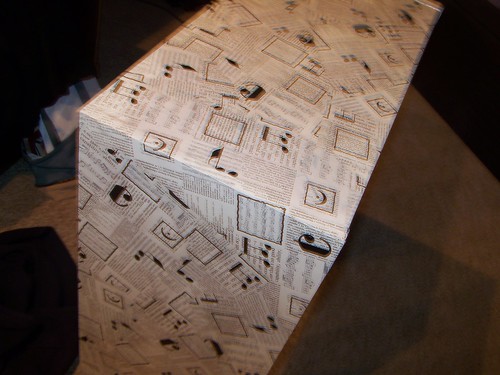
And now, the after:
I am really happy with the result and with how easy and inexpensive this was to do. The paper is the remnant of a roll of wrapping paper that I found behind my television while dusting. (Note to self, dust more, you may find more goodies.) I know there are various gluey substances that can be bought but this was done with good ol' white glue, a bit of water, and a sponge on a stick. The biggest problem I ran into was the bubbles that seemed to plague larger pieces. I had to spend extra time smoothing with my fingers.
If I start making cozies of any variety, please, someone, commit me to the nearest mental health facility.
Monday, March 3, 2008
Halloween Costumes
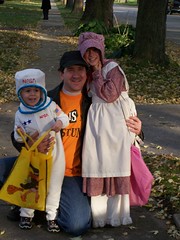
These costumes were made for my children for Halloween 2007. Mister D is an astronaut and Miss R is Laura Ingalls Wilder. Both costumes were made without patterns. I used pieces of their clothing for scale and shape.
The astronaut is made from cotton/poly sweatshirt fleece. The suit part is modeled after a pair of footie pajamas with a zipper. This was my first time putting a zipper in and I was very pleased with how easy it was. The helmet was based on my memories of bad vintage sci-fi. I made the shiny blue trim with some scrap lame, fat piping cord and hot glue. The stars and flag are iron on patches and the NASA logos are done freehand with red fabric paint. I managed to pull this together in less than a week as Mister D changed his mind less than a week before Halloween.
The prairie girl costume took me quite a long while to get right and even still there are things I see wrong with it, namely the way too long petticoat. Meh. Anyway, the dress is made from cotton calico with a tiny red and white flower print. The apron and petticoat are cream colored cotton broadcloth and the petticoat has an elastic waistband and poly lace trim. I used one of Miss R's shirts to get the size and shapes for the bodice, the rest of the costume was patternless, using period costume photographs for direction.
The guy in the middle is Mister P. His t-shirt loudly states "The IS My Costume." Nuff said.
The astronaut is made from cotton/poly sweatshirt fleece. The suit part is modeled after a pair of footie pajamas with a zipper. This was my first time putting a zipper in and I was very pleased with how easy it was. The helmet was based on my memories of bad vintage sci-fi. I made the shiny blue trim with some scrap lame, fat piping cord and hot glue. The stars and flag are iron on patches and the NASA logos are done freehand with red fabric paint. I managed to pull this together in less than a week as Mister D changed his mind less than a week before Halloween.
The prairie girl costume took me quite a long while to get right and even still there are things I see wrong with it, namely the way too long petticoat. Meh. Anyway, the dress is made from cotton calico with a tiny red and white flower print. The apron and petticoat are cream colored cotton broadcloth and the petticoat has an elastic waistband and poly lace trim. I used one of Miss R's shirts to get the size and shapes for the bodice, the rest of the costume was patternless, using period costume photographs for direction.
The guy in the middle is Mister P. His t-shirt loudly states "The IS My Costume." Nuff said.
Subscribe to:
Posts (Atom)
